Wilton Sand & Soil

 3 creative uses for decorative pebbles

3 creative uses for decorative pebbles

Author: Taguhi Tamrazyan

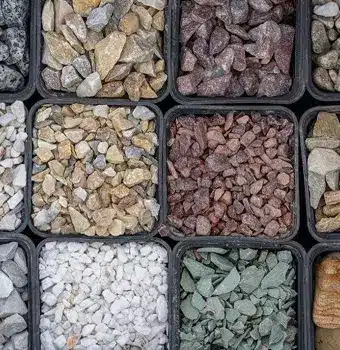
Decorative pebbles are an excellent way to give visual and textural interest to any garden or lawn. You can make your outdoor space look stylish and luxurious simply by adding them to your landscape design. Fill in an empty area with these pebbles and instantly add character and a natural feel to the space. Here are three ways to do it creatively:

Garden Mulch Made from Decorative Pebbles

Decorative pebbles are most commonly used as mulch in garden beds. Pebble mulch is an excellent choice for a variety of garden types. The only difference would be its initial installation costs which may be slightly higher than the conventional tree mulch. However, using decorative pebbles as garden mulch will incur lower long-term maintenance costs.

Because tree bark and mulch are organic, these will inevitably degrade and require regular replenishment. With these, you will need to replace your mulch every 6 to 12 months and your bark every 12 to 18 months. On the other hand, decorative pebbles will go a long way and may even last you a lifetime.

That being said, keep in mind that bark and mulch serve various functions in the garden that pebble mulch won’t be able to provide. First, it won’t protect your soil from erosion, extreme heat from the sun, and weed germination. Second, pebbles won’t decompose and nourish the garden bed with organic compost made from rotting timbers.

As a result, you will need to feed your plants and gardens in other ways, such as by regularly applying liquid and slow-release fertilisers. Pebble mulch is ideal for native and dry gardens where composted organics can be in short supply.

Decorative Pebbles

Using Pebbles in your Garden Pots

Large potted plants are an easy way to spruce up your deck, patio, or backyard. Planting in the ground is only sometimes possible, whether you are a renter or have limited space. To add more beauty to your feature pots, you can use decorative pebbles as finishing touches.

Decorative pebbles come in a variety of colours. This will let you to mix and match them to suit whatever colour scheme you want for your house, garden, or pots. They will add a nice splash of colour and protect your plants by keeping the potting medium from drying out too quickly in the heat.

Ground Coverage with Decorative Pebbles

Colour is a great way to liven up an otherwise drab space!  These pebbles may be your best option if there is a neglected corner in your lawn, pathway, or patio.

Place at least a 50mm layer of decorative pebbles for good, even coverage. You may also need weed control matting for this. For the most part, with a weed mat (and a little weed killer), the pebbles can be laid directly over the existing surface for an instant makeover.

If there will be foot traffic, 20 to 30-mm pebbles are the ideal choice. The smaller the pebble, the better they will be, as the smaller pebble types will leave footprints. As for driveways, a 20-mm layer of gravel will work the best because the jagged edges will lock in tyre movement.

Wilton Landscape Supplies can show you a variety of creative uses for decorative pebbles.  Contact our friendly staff today on 4630 9401 for more information.

Yard tip

One cubic metre of mulch covers roughly 13 square metres at 75mm deep. Measure your beds before you come in and we will get the quantity right first time.

What is efflorescence and how do I minimise it?

What is efflorescence

Author: Taguhi Tamrazyan

What is efflorescence and how do to minimise it? First lets see what efflorescence is , so many homeowners recognize efflorescence as a white, powdery material that shows on walls and tiled areas. It may form on any concrete, stone, brick, or stucco surface and is most prone to occur quickly after a cold, rainy winter. Efflorescence has existed since the beginning of time and is a severe aesthetic concern in the construction industry 

Let’s learn what it is and how you can minimise it.

What is Efflorescence?

Efflorescence is a mineral deposit that can build up on water, soil, and concrete surfaces. It develops when water runs over an area long enough to dissolve the minerals in the ground. This can sometimes cause unsightly stains and patches on your landscaping.

Remove Efflorescence

What Causes Efflorescence?

Efflorescence happens when water-soluble salts migrate to the surface of the concrete. Mineral salts may be formed as a consequence of the cement hydration process. It can also originate from various sources, such as sulphate-rich sand. Porous concretes, brickwork, and mortars will be more prone to salt migration to the surface.

In addition, efflorescence is more likely to occur if the concrete has a high concentration of mineral salts. When salty water migrates to the surface, it evaporates, leaving a salt deposit that causes white colouring.

How to Remove Efflorescence

The most straightforward method for removing efflorescence is to wash the substrate and clean the affected area to check whether the spots vanish. To prevent the worsening of the problem, use clean water only. The sooner you try to remove the stains, the better, since time will be on your side.

To remove any standing water, it is critical to use a wet vacuum or sweep away with a broom or squeegee. If you have done the following and still aren’t getting any positive results, the next step is to dry-brush the area with a non-metallic brush. After brushing, use a scraper to remove any remaining loose salt.

You can also use commercial products specifically made to remove efflorescence from concrete. However, you need to make sure that all fractures and seams are well sealed. Always test the product on a small area first to ensure that it will function and not degrade the concrete.

Yard tip

One cubic metre of mulch covers roughly 13 square metres at 75mm deep. Measure your beds before you come in and we will get the quantity right first time.

How to Minimise Efflorescence

If not removed, efflorescence will continue to grow and damage your paving, bricks, or concrete. If you have vertical brickwork, you can easily brush away the deposits and eliminate them without further treatment. For horizontal surfaces such as pavers, the white stain will still be visible, especially if you have dark-coloured materials. This will require you to use specialty cleaning products to eliminate them.

As mentioned above, sealing your pavers is crucial as it prevents them from accumulating new water from the top and restarting the drying process. Note that you need to allow your pavers the chance to dry out thoroughly a few weeks after laying. This will prevent you from sealing in the efflorescence.

Remember, efflorescence can be treated. Allow your pavers to dry completely if you find them in your garden, patio, or driveway. This gives you a higher chance of as much efflorescence reaching the surface as possible. You can then use a specialized product to treat the affected area.

4 great DIY sandpit ideas

4 great DIY sandpit ideas

Author: Taguhi Tamrazyan

Sandpits are a great way to get the whole family outside. While you can have games such as volleyball or cricket, sandpit play is for everyone, from babies in prams to adults. With a bit of planning and some simple tools, here are four great sandpit ideas that you can do yourself.

1. Stacks of Fun

Stack treated pine sleepers on top of each other and lay them on the ground to form a square. Join the sleepers together by driving nails into them. Ensure that the nail heads are below the surface to prevent them from hurting anyone. Attach a wooden board underneath to hold the sand in. Fill it with sand and toys to let the fun begin!

Note: Look for sleepers that are treated using paint or finishes that are safe for kids.

DIY sandpit ideas

2. Bring Life to an Old Table

Build a simple sand table using an old coffee table that you no longer use. Join square timber legs together using wide board screws on the top and bottom. Turn everything upside down and screw the boards into the ones that connect the legs at the top to make the sandpit’s base.

The result should be a simple sand pit but elevated. Fill the table with sand and enjoy!

This sandpit idea is ideal if you have limited space, as you can simply lift it after playtime and store it for later use.

3. A Hexagon Sandpit

Give your backyard some unique shapes and colours by making a hexagon sand pit. Gather some treated pine sleepers and join them together in this shape or any shape that you like. Paint them bright colours on different sides to make them stand out.

Cut a board to the exact shape and join it at the bottom. Fill it with sand and let your kids play to their hearts’ content.

Yard tip

One cubic metre of mulch covers roughly 13 square metres at 75mm deep. Measure your beds before you come in and we will get the quantity right first time.

4. A Deck Full of Fun

Another space-saving idea is a sandpit that you build into your deck. Cut the decking boards over the sandpit and attach a few pieces with timber to create a pair of lids. Hook them on one side so that you only need to fold the covers back over and get back to a full deck when the playtime is done.

Fill the space with sand and get the playtime started. You may want to paint the boards with different colours or choose to keep the natural finish of the treated pine. Make sure that there are no nail heads showing on the wood surface. Also, you may want to sand the wooden parts to ensure that there are no splinters to make it safe for children to use.

What makes these DIY sandpit projects even more enjoyable is that they’re low maintenance. Clean up is as simple as sifting the sand, taking out unwanted rocks and debris, rinsing it with water using a strainer, and letting it dry overnight.

What you need to know before starting a paving project?

starting a paving project

Author: Taguhi Tamrazyan

Making your next paving project efficient and successful involves some planning and preparation.

The following are a few things you need to keep in mind to ensure that everything goes smoothly to get you excellent results.

Paving project

The Tools You’ll Need

Before starting out on your landscaping paving project, ensure that you have the following materials:

    • Plate compactor – for leveling and smoothing the earth
    • Screeds – to flatten the paving sand
    • Screed rails – to guide your levels
    • Spirit level – to ensure that levels are correct
    • General gardening tools such as a rake, shovel, and mattock – for easy digging, clean up, or distribution uses
    •  White marking paint – to mark the area you’re going to pave
    •  Bucket and sponge – for cleaning
    • Rubber hammer – to strike your pavers down without damaging them
    • Hammer and bolster – to crack stones, blocks, or bricks
    • String line – to regulate paving machine height and grade steering
    •  Wood floats – to help you erase flaws and create smoother surfaces
    • Diamond brick blade saw – for cutting pavers
    •  Wheelbarrow – to carry soil, bricks, and other materials
    •  Tape measure
    • Safety gear such as gloves, glasses, knee pads, and earmuffs
    •  Cement mixer (optional)

Once you have these items you can now start preparing the base. While most of these are available at your gardening supply stores, you can rent some such as the plate compactor, the wheelbarrow, or the cement mixer.

Preparing the Base

Paving an unused region of your backyard begins with building a sound foundation. Here is a step-by-step guide to help you get the job done smoothly:

    1. Measure the area you want to pave, then outline the edges using white marking paint to serve as a guide.
    2. Lay the road base in a series of mounds. Use a wheelbarrow to make it easier to spread evenly over the whole area.
    3. Using a shovel, spread the base, then level it with a rake. Use a tape measure to determine a depth of roughly 70mm.
    4. Dampen the foundation with a hose, then compact it using a plate compactor to lower its depth by around 10mm.
    5. Spread paving sand over the base in a series of mounds to ensure level distribution.
    6. Level the sand with a rake to leave a layer 20-30mm thick.
    7. Place screed rails on either side of the sand bed so that their surface is at the desired finishing level.
    8. Using a screed and a spirit level, level the sand layer. Work backward to avoid disturbing the completed surface.

Yard tip

One cubic metre of mulch covers roughly 13 square metres at 75mm deep. Measure your beds before you come in and we will get the quantity right first time.

How to Lay Your Pavers

Follow these simple steps to lay your pavers.

    1. Build a sand bed on top of your base. Add a layer of paver sand to your paver base. Smooth out the sand layer using a wooden float to create a flat surface.
    2. Lay your pavers and trim them as needed. Begin laying paver stones in the pattern of your choice. Cut your paver stones with a diamond brick blade saw to fill any gaps left along the side. Wear protective equipment such as gloves and safety glasses when cutting your pavers.
    3. You can now add your edge constraints to keep your pavers straight and separate them from the earth.
    4. Using your plate compactor, secure and push down the pavers into the sand bed.

How to Cut Pavers

When laying pavers, you will most likely need to cut some to fit the layout. Below is a guide to help you do it safely and efficiently:

    1. Using a ruler and chalk or pen, measure the brick paver and indicate where the brick should be cut.
    2. Wear safety goggles and a dust mask to protect yourself from flying debris and dust. You may set the brick on an additional stone-cutting surface and cut it effortlessly. Hold the paver securely in one hand, taking care not to let your fingers get in the way of the blade.
    3. Switch on the diamond-bladed saw. Slowly move the saw away from you in the other direction while cutting along the mark.
    4. Once you’ve completed cutting, turn off the saw and carefully inspect the brick, as you may need to sand or shape the edges.

How to Finish Your Paving

To finish off your paving project, do the following steps:

    1. Once the pavers are in place, apply a layer of paver sand (also called joint fill sand) to fill in the spaces between them. Sweep any remaining sand from the whole area.
    2. Once you’ve finished filling the gaps with sand, apply a paver sealant to your pavers to further secure them and keep them from slipping.

Whether you’re building a DIY patio, driveway, walkway, or pool deck, pavers are a simple method to simplify outdoor areas while also adding value. This guide is sure to help you get the job done efficiently.

Speak to the friendly staff at Wilton Landscape Supplies 4630 9401 regarding your paving project.

How to lay and care for a new lawn

care for a new lawn

Author: Taguhi Tamrazyan

Lay and care  for a new lawn can be an enjoyable and exciting project for homeowners. While some people get overly excited about , it is essential to remember that care must be taken during the process. A proper understanding will ensure that your new lawn lives up to your expectations and lasts for many years.

Prepare the soil

If the soil has old turf, you can strip it off and let the old turf turn into compost which you can use later. If the soil is weedy, treat it with a weed killer first, let the weed die, and start digging to a depth of about 15 centimetres.

This conditions and improves the soil structure. While doing this, remove large stones or any perennial weeds that may have been left behind. Sprinkle compost to help it retain moisture.

Level and firm the soil

Level and firm the soil

Second step to Lay and care for a new lawn is to continue forking it down until the soil is levelled and firm. Consolidate the surface to make sure that there are no hollows underneath. You can do this by going over the earth on your heels and walking up and down the lawn to eliminate the air pockets.

What you want to see is a nice, firm lawn surface. This is crucial because when you lay turf and it’s not levelled down properly, you’ll have uneven results. Then check the soil levels to see if the surface aligns with your path or patio.

Once done, leave the area for several weeks until it settles. After this, a good layer of fertiliser will ensure a healthy, vibrant lawn. Doing this will provide the nutrients your plants need to grow.

Yard tip

One cubic metre of mulch covers roughly 13 square metres at 75mm deep. Measure your beds before you come in and we will get the quantity right first time.

Laying the turf

Start by finding a straight edge – this can be a path or below a hedge planting. Lay the turf along this straight edge, overlapping the top corner of the turf so you can cut it neatly when you’re done. Unroll the turf and butt it up to the straight edge.

Tap it with your hand to firm it down and settle the turf into the soil. Place your second piece of turf following the straight edge. Make sure it is butted up tightly to the first turf. Place the other turf pieces until you cover the whole area.

Caring for your new lawn

Once done laying the turf, ensure you get your water on. Doing this will prevent the grass from drying out and turning brown. Be sure to water before the end of the day, especially on warm and dry days.

It’s best to sprinkle immediately once you’re done with a section. Soak each square metre before moving on to the next until you go through it all. To preserve water, having a water tank is highly recommended.

That said, keeping the soil surface moist is crucial as this gives the roots of the new turf a chance to become established. We recommend watering in the morning and afternoon every day for at least two to three weeks. Your local conditions will determine the amount of water your lawn needs.

If you’re unsure, a good recommendation would be to place a wet towel on your law for the first few days. Once it dries out, this is a sign that your lawn needs more water. At this stage, water will be critical, so make sure to check your lawn thoroughly.

Move the towel around to prevent it from damaging your new turf. You may now notice that the edges of your new turf are drying out. Don’t panic, as this is a normal occurrence.

Water your new lawn regularly for the first six weeks or until you’ve mowed it several times. Once established, your lawn will require less frequent and deeper watering. This allows the roots to penetrate deeper into the soil, further drought-proofing your lawn.

This means that your lawn will not need irrigation as frequently. This saves you time and money, and more importantly, water. This is better for the environment and critical in times of drought.

Most new lawns can take around eight weeks to establish, depending on location and time of year. You can check to see if your lawn has established itself after two or three weeks. To do this, simply pull a corner of one of the pieces and see if it holds well.

How to maintain your garden like a pro

Author: Taguhi Tamrazyan

Your garden is your pride and joy. It’s also a great way to relax and enjoy nature. But a garden requires continuous maintenance to stay healthy, and maintaining it can sometimes be quite the challenge. Here are are some tip to take care your garden like a pro:

Getting Started

Do a bit of research on the plants you want to grow. This way, you’ll learn their specific needs (how much sunlight and fertilisers to use) to take care of them better.

Get a journal and take notes in it to keep careful track of what works and what doesn’t. Not only will you have a record of what you grew each year, but you will also be able to track and monitor your progress.

Know your local conditions. Doing this will guide you toward what to plant and how to care for them. You may also want to check out the gardens in your neighbourhood to see what will grow well in your garden.

Planting Tips

Planting Tips

Dig a hole at least twice as wide but not deeper than the root ball to give your plants the best start in their new home. Maintain good moisture levels for the first few weeks after planting to help the plant establish its roots.

Use high-quality soil when potting flowers or plants in containers. This is an investment that will help them in thrive.

Help your plants stay healthy by applying about three centimetres of water per week during the growing season.

Perennials are best planted in the fall, but early spring will do as well if you miss out on fall planting. These flowers add various colours and textures to your garden, undoubtedly improving its curb appeal.

Choose the right plant for the right location and give it enough space to grow.

Yard tip

One cubic metre of mulch covers roughly 13 square metres at 75mm deep. Measure your beds before you come in and we will get the quantity right first time.

Best Practices for Soil and Mulching

Till the soil and add organic materials such as compost before planting in your new garden: the better the soil quality, the more beautiful your garden or landscape.

Mulches should be applied in the spring to help control the weeds and retain moisture. Organic mulches like pine straw, bark, or compost are excellent options. Mulch is typically applied in layers 5 to 8 centimetres thick.

Keep the mulch at least 7 to 15 centimetres away from the trunks of young trees and shrubs. Keep the mature trees at least 20 to 30 centimetres away from the mulch.

Rake the surface of old mulch to make it look nicer, then add fresh mulch to a depth of 5 to 10 centimetres. Only remove old mulch if it has compacted and is shedding water.

 In wet or poorly drained areas, do not mulch at all.

 Replace or refresh the mulch once every 2-3 years.

Pruning for Beginners

Spring flowering plants should be pruned right after they bloom. On the other hand, you should prune most summer flowering plants later in the winter or early spring before they bloom.

Most fruit trees and berry plants require pruning while they are in their dormant stages.

Most perennial plants must be cut back entirely before or after the growing season.

Choose which branches to keep and remove based on health, shape, growth pattern, and personal preference. As a general rule, you should get rid of any weak, dead, or diseased canes and branches.

Cut all dead growth to the ground in the fall or early spring.

Mowing Tips and Tricks

Mowing in different directions frequently helps prevent ruts. For example, move vertically across the garden this week, then horizontally the following week. It is also crucial to mow on a regular basis. For best results, only remove one-third of the grass height when cutting, and keep your mower blade sharp.

Aerate your garden to promote and improve root growth and help in the absorption of water and fertilizer to the roots. The best time to do this is when it is just starting its active growing cycle, which is late spring for warm-season turfs and early fall for cool-season turfs.

Edge sidewalks, driveways, and bed edges with a stick edger or weed eater to create clean, crisp lines that will enhance the appearance of your landscape.

Make sure you’re wearing proper eye and ear protection.

Wilton Landscape Supplies can help you keep your garden in top shape.  Contact our friendly staff on 4630 9401 for more information.