Wilton Sand & Soil

Topsoil vs Garden Soil vs Potting Mix: What’s the Difference (and When to Use Each)

Topsoil, garden soil and potting mix piles side by side, Wilton Sand & Soil.

Category: landscaping supplies

Topsoil is plain fill soil with no added nutrients, best for bulk filling and levelling. Garden soil is topsoil blended with compost, suited to in-ground beds and vegetable patches. Potting mix is a soilless blend engineered for containers. Two different Australian Standards govern them — AS 4419 for topsoil and garden soil, AS 3743 for potting mix.

Topsoil vs garden soil vs potting mix — they aren’t three versions of the same thing. Instead, each one does a specific job. Using the wrong one is one of the most common reasons a garden bed or pot underperforms. Topsoil is plain fill soil. Garden soil combines topsoil with compost and nutrients. Manufacturers, meanwhile, engineer potting mix as a soilless blend specifically for containers.

Topsoil vs Garden Soil vs Potting Mix: The Core Differences

Top Soil

Topsoil is exactly what the name suggests. Producers take it from the upper layer of the ground, then screen it to remove large debris. It doesn’t contain added compost, fertiliser or other amendments. Because of that, it’s the most affordable of the three, and it works best for bulk filling rather than feeding plants directly.

Garden soil starts as topsoil. Producers then blend it with compost and other organic matter. That blend gives it the nutrition plain topsoil lacks. As a result, it suits vegetable patches, flower beds and general planting. It’s heavier and holds water longer than potting mix, since it still contains real soil rather than a soilless blend.

Potting mix is different again. Instead of soil, manufacturers build it from materials like composted bark, coconut coir, and sometimes peat, along with perlite or vermiculite for aeration. None of that is soil in the traditional sense. That’s exactly why potting mix drains and aerates so much better in a confined container.

The Australian Standards That Actually Govern These Products

Two separate Australian Standards actually govern these products, and almost nothing written about this topic mentions both. AS 4419, Soils for Landscaping and Garden Use, sets requirements for topsoil and garden soil blends. It covers pH, organic matter content, bulk density and drainage. Potting mixes, however, fall under a completely different standard, AS 3743. That’s why a bag of quality potting mix carries a Red Tick or Black Tick logo instead.

That tick system is worth understanding before you buy. A Red Tick means the mix meets AS 3743’s premium grade. This generally includes enough fertiliser to feed plants for around three months after potting. A Black Tick means the mix meets the regular grade instead, which typically needs you to add fertiliser from the day you pot up. Both ticks confirm the mix meets minimum requirements. However, the tick alone doesn’t replace checking the actual ingredient list.

Topsoil and garden soil don’t carry the same tick system. However, AS 4419 still applies to them. It sets requirements like pH, organic matter content and drainage for soils that suppliers sell in bulk or bagged lots. This is exactly why a reputable supplier’s topsoil and garden soil should behave consistently between deliveries.

Which One Do You Actually Need?

Rich garden soil ready for delivery, screened and blended at Wilton Sand & Soil

When it comes to topsoil vs garden soil vs potting mix, knowing which product fits a given job removes most of the guesswork. Reach for topsoil when bulk filling, levelling low spots in a lawn, or building up a garden bed’s structure. Choose garden soil once you’re planting directly into a bed and need plants to actually thrive there, not just have somewhere to sit. Potting mix, meanwhile, belongs exclusively in pots, hanging baskets and other containers, since garden soil and topsoil both compact too heavily in a confined space and starve roots of oxygen.

Raised Beds Are a Special Case

Raised garden beds sit in a slightly different category, depending on depth. A shallow raised bed, under around 30cm deep, behaves more like a container than an in-ground bed. Consequently, a lighter blend closer to potting mix, or a soil-potting mix combination, generally performs better here. A deeper raised bed has enough room for roots to spread and drain properly, so garden soil works well, particularly when blended with some potting mix for structure.

A Worked Example

SOIL

For example, picture a homeowner building a new 4-square-metre vegetable bed, 30cm deep. Using plain topsoil to fill it would leave the bed structurally sound but nutrient-poor. Every plant would then need heavy feeding from day one. Garden soil, blended with compost, gives the bed a head start instead, since producers already work the organic matter through rather than adding it on top afterwards.

Compare that to filling a set of large outdoor pots for a courtyard. Using garden soil here would be a mistake, even though it worked well in the vegetable bed. The heavier, denser soil compacts inside a container, cutting off oxygen to the roots. It also holds water long enough to cause rot. Potting mix avoids that problem entirely, since manufacturers engineer it specifically for confined drainage.

Common Mistakes

One mix-up shows up constantly. Homeowners sometimes buy topsoil expecting it to perform like garden soil, then wonder why new plantings struggle. Topsoil was never meant to feed plants on its own. Adding compost, or switching to garden soil from the start, solves this before it becomes a problem.

A second common mistake runs the other way. Using garden soil, or worse, straight topsoil, in pots or raised planters under 30cm deep leads to compacted, waterlogged containers within a single season. Potting mix costs more per bag. However, it’s the only one of the three that manufacturers actually build for that job.

Finally, a third mistake involves treating all three as interchangeable once a project runs over budget. Substituting whatever’s left over from a previous job might save a delivery fee upfront. Ultimately, though, it usually means redoing the work once plants fail to establish properly.

Therefore, ordering the right product in the right quantity removes the last piece of guesswork. Before ordering, check the delivery information page. This helps confirm that a supplier can schedule bulk topsoil, garden soil and potting mix together, particularly on a larger job using more than one product.

Ready to Get the Right Soil for the Job?

Getting the topsoil vs garden soil vs potting mix choice right the first time saves both money and a frustrating season of underperforming plants. Wilton Sand & Soil’s team has spent two decades helping Sydney and Southern Highlands homeowners, landscapers and builders choose the right soil for the job, whether that’s a single bag of potting mix or a full truckload of garden soil. Get a quote today and start with the right product.

Frequently Asked Questions

Can I use garden soil in pots?

It’s not recommended. Garden soil compacts inside containers, cutting off oxygen to roots and holding water long enough to cause rot. Potting mix is engineered specifically for container drainage.

It means the mix meets AS 3743’s premium grade, which generally includes enough fertiliser to feed plants for around three months. A Black Tick meets the regular grade and typically needs fertiliser added from the start.

Topsoil is plain fill soil with no added nutrients. Garden soil is topsoil blended with compost and organic matter, making it suitable for planting directly rather than just filling space.

It depends on depth. Beds under about 30cm deep behave more like containers and suit a lighter blend closer to potting mix. Deeper beds have room for garden soil to work well.

Yes. AS 4419, Soils for Landscaping and Garden Use, sets requirements for pH, organic matter and drainage. It’s separate from AS 3743, which governs potting mixes specifically.

How Much Soil Do I Need for a Garden Bed? A Simple Guide to Getting the Quantity Right

How much soil is needed to fill a garden bed, Wilton Sand & Soil.

Category: landscaping supplies

To work out how much soil you need for a garden bed, multiply the length, width and depth in metres. This gives you cubic metres. Add roughly 10% for settling. A typical 2m x 1m bed filled 30cm deep needs about 0.66 cubic metres of soil. Local soil conditions and whether you buy bagged or bulk will change the real-world answer.

Work out how much soil you need by multiplying length x width x depth. Measure all three in metres to get a volume in cubic metres. A standard raised bed measuring 2m long, 1m wide and 30cm (0.3m) deep needs 2 x 1 x 0.3, or 0.6 cubic metres. Most gardeners then add 10% for settling. That brings the real order closer to 0.66 cubic metres.

How to Calculate How Much Soil You Need for a Garden Bed

Garden Soil

The formula is straightforward once the units are in metres. First, multiply the bed’s length by its width to get the area in square metres. Then multiply that figure by the depth of soil you want. The result is the volume in cubic metres. Suppliers across Sydney and the Southern Highlands measure and sell bulk soil this way.

Depth is where most people get the calculation wrong. Convert centimetres to metres before multiplying. Mixing units is the most common source of ordering mistakes. Fifteen centimetres becomes 0.15 metres. Thirty centimetres becomes 0.3 metres. Once everything’s in the same unit, the maths stays simple.

If you’d rather work in litres, multiply your cubic metre figure by 1,000. This matters because Australian suppliers almost always sell bagged soil by the litre. They quote bulk soil and trailer loads by the cubic metre instead.

A Worked Example for a Typical Garden Bed

Picture a garden bed 3m long, 1.2m wide, filled to a depth of 25cm. That’s 3 x 1.2 x 0.25, which equals 0.9 cubic metres. Add the usual 10% buffer for settling, and the real order comes to roughly 1 cubic metre.

For a smaller bed, say 1.5m by 1m at 20cm deep, the calculation is 1.5 x 1 x 0.2, or 0.3 cubic metres. That’s a manageable trailer load for most weekend gardeners. It also fits well within a single delivery run.

Soil does settle once it’s watered in. It can lose 10 to 15% of its volume within the first few weeks. Ordering exactly to the calculated figure often leaves a bed slightly short once everything beds down. That’s why the buffer matters more than it seems.

The same formula scales up easily for a full landscaping job. Picture a homeowner refreshing four garden beds, each 2m by 1.5m at 25cm deep. Provided the beds are roughly the same size, they can simply multiply one bed’s volume by four rather than measuring each bed separately. That comes to 0.75 cubic metres per bed, or 3 cubic metres across all four once you add the settling buffer. Builders and landscapers working across several properties in a week often use this shortcut. It lets them quote jobs quickly without re-measuring every site from scratch.

Topsoil, Garden Soil or Potting Mix? Choosing the Right Blend

Turf underlay

The right product depends on what’s going into the bed, not just how much space needs filling. Plain topsoil is best for bulk filling, levelling and grading, where the goal is structure rather than nutrition. Garden soil combines topsoil with compost and organic matter. It suits vegetable patches and flower beds where plants need ongoing nutrition. Potting mix, meanwhile, is a lighter, free-draining option. Manufacturers formulate it specifically for containers and raised planters rather than in-ground beds.

Sustainable Gardening Australia, a not-for-profit body focused on soil health, highlights organic matter content as a key factor here. It shapes how well a garden bed holds moisture. It’s also key to how well a bed feeds plants over time. That’s exactly why plain topsoil alone often falls short for anything you actually want to grow well. Most established gardens do best with a topsoil-and-compost blend rather than either extreme on its own.

Why Sydney and Southern Highlands Gardens Often Need More Than the Formula Says

Local soil conditions change the real-world answer more than most calculators account for. Sydney basin soils are often clay-heavy. Clay compacts down noticeably once it’s wet. This is one of the most common reasons Wilton Sand & Soil customers come back for a top-up load a few weeks after their first delivery.

Southern Highlands properties, by contrast, often sit on sandier, more free-draining, sandstone-derived soil. This type of soil settles differently again. It can also mean a garden bed needs a slightly deeper fill to hold moisture through a dry Sydney summer. Neither condition is a problem. However, knowing which one applies to your block before you order saves a second delivery later.

As of 2026, most online calculators still don’t account for this kind of local soil variation. That’s because most calculator tools use a single generic formula rather than accounting for the ground conditions of any particular region.

Buying in Bulk or by the Bag — What Actually Works

SOIL

Bagged soil suits small top-ups, potted plants, and beds under about a quarter of a cubic metre. Anything larger becomes expensive and awkward to carry bag by bag. Once a project passes that rough threshold, buying in bulk by the cubic metre almost always works out more practical.

Bulk orders also mean the soil arrives screened and consistent, load after load, rather than varying bag to bag. For a full garden bed rebuild or a new landscaping project, a bulk cubic-metre order removes most of the guesswork bagged soil involves. The truck delivers it straight to where you need it.

There’s also an access factor worth considering before deciding between the two. Bagged soil makes sense for a backyard with narrow side access, since you can carry bags through a gate a few at a time. A bulk load, however, needs somewhere for a truck to tip it. That might be a driveway, a nature strip, or another spot the truck can reach directly. Checking access before ordering in bulk avoids a delivery day surprise. It’s worth mentioning any tight access when placing the order.

Getting Your Soil Delivered Without the Guesswork

Once you’ve worked out the quantity, getting it to the right spot is the next hurdle. Wilton Sand & Soil delivers using its own tipper trucks rather than third-party freight. That means delivery dates stay in-house, and the driver places the load exactly where you need it rather than dumping it at the kerb.

Checking the delivery information page first helps confirm scheduling before the order goes in. This applies whether the job needs a single trailer load of garden soil or a full truckload of top soil. Smaller container or raised-planter jobs, meanwhile, often suit potting mix better than garden soil, since manufacturers formulate it specifically for confined spaces.

Ready to Order the Right Amount?

Getting the quantity right the first time saves a second delivery and keeps a project moving. Wilton Sand & Soil’s team has spent two decades helping Sydney and Southern Highlands homeowners, landscapers and builders work out exactly what a job needs. That might be a single bag or a full truckload. Get a quote today and order with confidence.

Frequently Asked Questions

How much soil do I need for a small garden bed?

For a small bed around 1.5m by 1m, filled 20cm deep, you’ll need roughly 0.3 cubic metres of soil. Always add about 10% extra for settling.

Topsoil is plain fill soil, best for levelling and bulk filling. Garden soil is topsoil blended with compost and organic matter, formulated to support plant growth. Most vegetable and flower beds do better with garden soil or a blend.

Bagged soil suits small top-ups and container work, generally under a quarter of a cubic metre. Beyond that, bulk by the cubic metre is almost always more practical and arrives screened and consistent.

Add roughly 10% on top of your calculated volume. Soil typically loses 10–15% of its volume within the first few weeks as it beds down.

Yes. Clay-heavy Sydney basin soils compact more once wet, while sandier Southern Highlands soils drain and settle differently. Knowing your local soil type before ordering can help avoid a second, unplanned delivery.

 3 creative uses for decorative pebbles

3 creative uses for decorative pebbles

Category: landscaping supplies

Decorative pebbles are an excellent way to give visual and textural interest to any garden or lawn. You can make your outdoor space look stylish and luxurious simply by adding them to your landscape design. Fill in an empty area with these pebbles and instantly add character and a natural feel to the space. Here are three ways to do it creatively:

Garden Mulch Made from Decorative Pebbles

Decorative pebbles are most commonly used as mulch in garden beds. Pebble mulch is an excellent choice for a variety of garden types. The only difference would be its initial installation costs which may be slightly higher than the conventional tree mulch. However, using decorative pebbles as garden mulch will incur lower long-term maintenance costs.

Because tree bark and mulch are organic, these will inevitably degrade and require regular replenishment. With these, you will need to replace your mulch every 6 to 12 months and your bark every 12 to 18 months. On the other hand, decorative pebbles will go a long way and may even last you a lifetime.

That being said, keep in mind that bark and mulch serve various functions in the garden that pebble mulch won’t be able to provide. First, it won’t protect your soil from erosion, extreme heat from the sun, and weed germination. Second, pebbles won’t decompose and nourish the garden bed with organic compost made from rotting timbers.

As a result, you will need to feed your plants and gardens in other ways, such as by regularly applying liquid and slow-release fertilisers. Pebble mulch is ideal for native and dry gardens where composted organics can be in short supply.

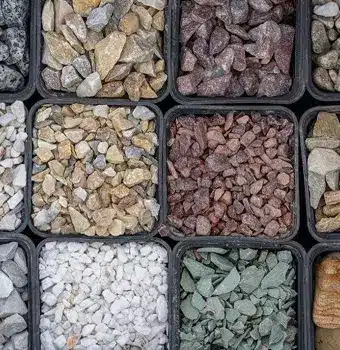
Decorative Pebbles

Using Pebbles in your Garden Pots

Large potted plants are an easy way to spruce up your deck, patio, or backyard. Planting in the ground is only sometimes possible, whether you are a renter or have limited space. To add more beauty to your feature pots, you can use decorative pebbles as finishing touches.

Decorative pebbles come in a variety of colours. This will let you to mix and match them to suit whatever colour scheme you want for your house, garden, or pots. They will add a nice splash of colour and protect your plants by keeping the potting medium from drying out too quickly in the heat.

Ground Coverage with Decorative Pebbles

Colour is a great way to liven up an otherwise drab space!  These pebbles may be your best option if there is a neglected corner in your lawn, pathway, or patio.

Place at least a 50mm layer of decorative pebbles for good, even coverage. You may also need weed control matting for this. For the most part, with a weed mat (and a little weed killer), the pebbles can be laid directly over the existing surface for an instant makeover.

If there will be foot traffic, 20 to 30-mm pebbles are the ideal choice. The smaller the pebble, the better they will be, as the smaller pebble types will leave footprints. As for driveways, a 20-mm layer of gravel will work the best because the jagged edges will lock in tyre movement.

Wilton Landscape Supplies can show you a variety of creative uses for decorative pebbles.  Contact our friendly staff today on 4630 9401 for more information.

Yard tip

One cubic metre of mulch covers roughly 13 square metres at 75mm deep. Measure your beds before you come in and we will get the quantity right first time.

4 great DIY sandpit ideas

4 great DIY sandpit ideas

Category: landscaping supplies

Sandpits are a great way to get the whole family outside. While you can have games such as volleyball or cricket, sandpit play is for everyone, from babies in prams to adults. With a bit of planning and some simple tools, here are four great sandpit ideas that you can do yourself.

1. Stacks of Fun

Stack treated pine sleepers on top of each other and lay them on the ground to form a square. Join the sleepers together by driving nails into them. Ensure that the nail heads are below the surface to prevent them from hurting anyone. Attach a wooden board underneath to hold the sand in. Fill it with sand and toys to let the fun begin!

Note: Look for sleepers that are treated using paint or finishes that are safe for kids.

DIY sandpit ideas

2. Bring Life to an Old Table

Build a simple sand table using an old coffee table that you no longer use. Join square timber legs together using wide board screws on the top and bottom. Turn everything upside down and screw the boards into the ones that connect the legs at the top to make the sandpit’s base.

The result should be a simple sand pit but elevated. Fill the table with sand and enjoy!

This sandpit idea is ideal if you have limited space, as you can simply lift it after playtime and store it for later use.

3. A Hexagon Sandpit

Give your backyard some unique shapes and colours by making a hexagon sand pit. Gather some treated pine sleepers and join them together in this shape or any shape that you like. Paint them bright colours on different sides to make them stand out.

Cut a board to the exact shape and join it at the bottom. Fill it with sand and let your kids play to their hearts’ content.

Yard tip

One cubic metre of mulch covers roughly 13 square metres at 75mm deep. Measure your beds before you come in and we will get the quantity right first time.

4. A Deck Full of Fun

Another space-saving idea is a sandpit that you build into your deck. Cut the decking boards over the sandpit and attach a few pieces with timber to create a pair of lids. Hook them on one side so that you only need to fold the covers back over and get back to a full deck when the playtime is done.

Fill the space with sand and get the playtime started. You may want to paint the boards with different colours or choose to keep the natural finish of the treated pine. Make sure that there are no nail heads showing on the wood surface. Also, you may want to sand the wooden parts to ensure that there are no splinters to make it safe for children to use.

What makes these DIY sandpit projects even more enjoyable is that they’re low maintenance. Clean up is as simple as sifting the sand, taking out unwanted rocks and debris, rinsing it with water using a strainer, and letting it dry overnight.